Title here
Summary here
This guide walks through a complete first-time setup.
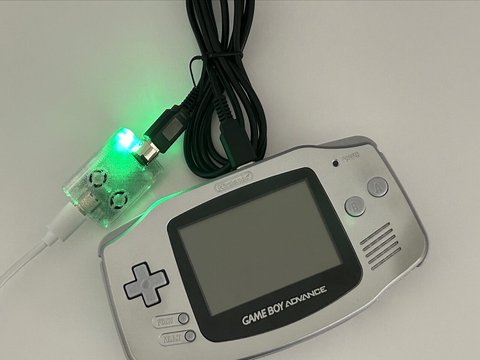
GBA link cables have two different connectors:
The GB-Link adapter must be connected to the master (slim) connector for GBA modes.
Tip: Connect the cable to the adapter before selecting a GBA mode in the web app. The firmware detects the cable type at mode selection time.
Open launcher.gblink.io and plug your adapter into USB if it is not already connected.
Scroll to the Device Health panel (right side on desktop, below the game list on mobile). You should see:
Click Connect. Your browser will open its own permission UI — the steps below depend on which browser you use.
The Device Health panel switches from the Connect button to a details view:
| Label | What you should see |
|---|---|
| Status | Connected (Chrome/Edge) or Connected (WebSerial) (Firefox) |
| Firmware | Your version number (e.g. 2.2.1) — click to copy |
| USB ID | A vendor:product code (e.g. 2fe3:0003) |
| Disconnect | Grey button at the bottom of the panel |
The page footer should show something like WebUSB: WebUSB · Browser: Google Chrome. The adapter LED should turn green.
launcher.gblink.io wants to connect to a USB devicecafe or 239a).If the list is empty or says No compatible devices found, the Connect button in the modal stays disabled. Check that the adapter LED is on, try another USB port, or see Linux permissions below.
If you closed the modal, click Connect on the launcher again — the browser only shows the picker after you click that button.
Optional plug-in shortcut: If Open the launcher automatically when this adapter is plugged in is enabled on your adapter, Chrome may show a system notification when you plug in USB. Click the notification to open the launcher, then click Connect and complete the steps above.
Same modal as Chrome:
launcher.gblink.io wants to connect to a USB deviceSame as Chrome — look for the wants to connect to a USB device modal, select your adapter, click Connect.
Firefox uses WebSerial, not WebUSB. After you click Connect in Device Health, you go through up to three prompts.
Firefox asks permission to install a small add-on so the site can use serial ports. You only see this once per Firefox profile.
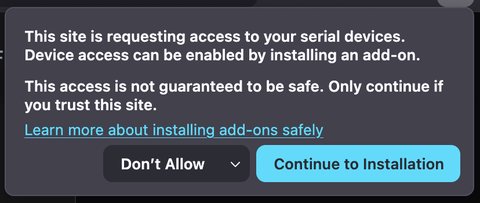
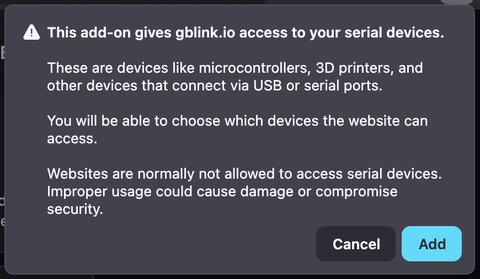
Return visits skip steps A and go straight to the port picker below.
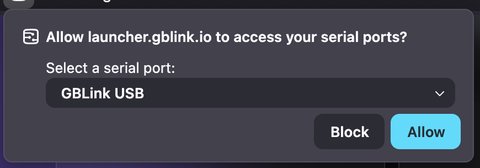
If the dropdown says No serial ports available, replug the adapter and click Connect again.
Device Health should show:
Connected (WebSerial)One-click Update firmware requires Chrome or Edge. On Firefox, expand Flash manually instead and use Download firmware (.uf2) if you need to update.
launcher.gblink.io wants to connect to a USB deviceIf the list is empty, check OTG is enabled in your phone settings and try replugging the cable.
| Browser / platform | What happens |
|---|---|
| Safari (macOS, iOS) | No USB picker — Connect does nothing useful |
| Firefox on Android | No serial port picker |
| iOS (all browsers) | No USB access from the browser |
| Firefox older than 151 | WebSerial not available |
Game cards on the launcher page still open, but Device Health cannot connect the adapter. Use Chrome or Edge on desktop, or Chrome on Android.
In Device Health you should see:
Connected or Connected (WebSerial)Unknown)2fe3:0003The page footer should show your browser name and WebUSB: WebUSB (or WebSerial (fallback) on Firefox).
If connection fails, click Connect again, try another USB port, or unplug and replug the adapter.
On Linux, browsers need permission to access USB devices. Run this once from the firmware repository:
./scripts/setup-permissions.shThis installs udev rules for both WebUSB and WebSerial.
From the launcher you can:
See Updating Firmware and LED Status Indicators for details.